How to deep clean your 4WD after an off road trip
Doing it in the dirt
Ever come home from your latest offroad adventure and not know where or how to even begin cleaning the evidence of your fun? This guide will run you through some of the tricks we've picked up over the years, and our custom products specifically for 4WDs and those who love them.
Our latest cutting edge range of 4WD detailing products are purpose built for these tougher jobs to make them faster and easier than ever before.

Before you finish your adventure
This won't always apply to you, but any creek or river crossings on your route can serve as a super effective pre clean for your undercarriage, leaving the dirt behind rather than bringing it all the way home with you. Just be sure to allow brakes, exhausts, diffs and gearboxes to cool before doing this.

Underbody cleaning and protection
Park your vehicle on the grass, to avoid a messy driveway clean up later. Remove your bash plates if so inclined to get a more thorough clean. If you have a lot of heavy chunks of mud, you'll want to blast these off with the pressure washer or hose as best you can first.
Fill up your Snow Blow Cannon bottle with 900mL of water, and add 100mL of Mega Snow Job to it. Give it a good shake to mix it thoroughly, and then begin foaming the underbody, making sure to adjust the fan spread to get good coverage of all underbody components. Pay particular attention around the wheel arches as these tend to be the dirtier areas. You'll want to aim to use about half the cannon bottle here, saving the other half for the regular wash later on.
Allow the Mega Snow Job a few minutes to dwell, and then begin rinsing off, either with the pressure washer or a hose sprayer on the jet setting. Spend a long time doing this, being thorough and rinsing every potential location that mud or sand could be hiding. Places like the top side of chassis rails and exhaust mufflers, inside plastic bumpers and side step railings, around the gearbox and bellhousing, inside bash plates and guards etc.
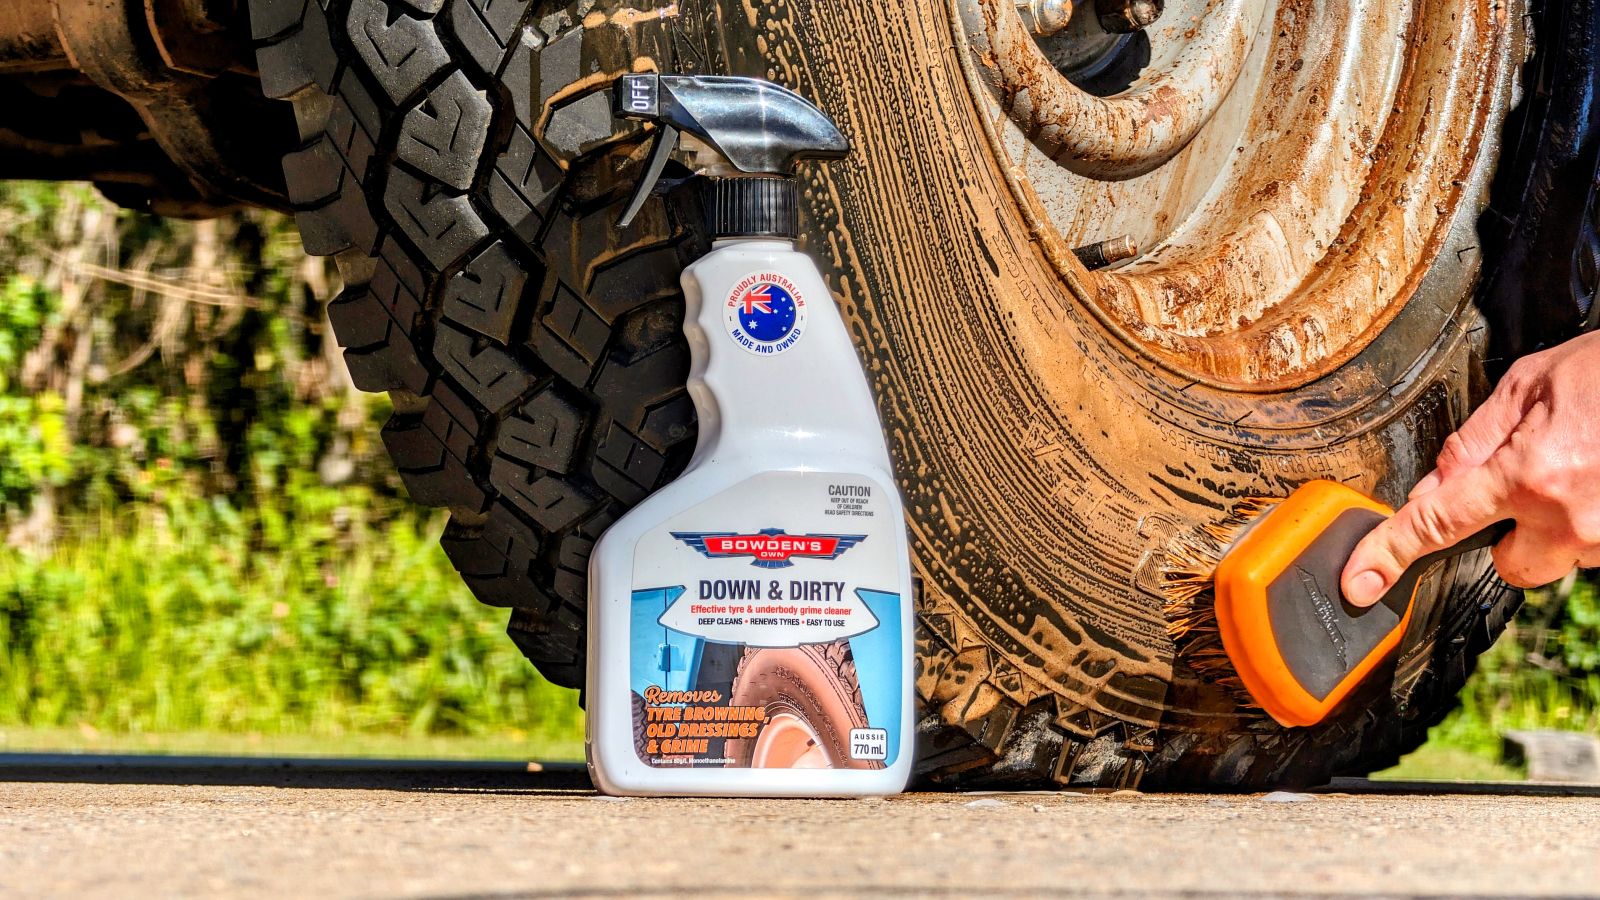
Down & Dirty can be used for a deeper clean of more muddy or stained areas as well, paired with any of our brushes, particularly in and around wheel arch wells and suspension parts.
Now that that the majority of the mud, sand and salt has been removed, it's time to clean out the inside of the chassis rails. This is one of the most important steps if you want the vehicle to last a long time, as all of these things can build up inside and create wet spots which will quickly accelerate rust. We've all seen the tricks with parking over a sprinkler or using an underbody pressure sprayer attachment, and frankly these methods are just not that effective at removing mud, salt and sand from inside the nooks and crannies of your chassis components.
We like to flush one chassis rail at a time. Ideally, park your vehicle nose down on a slight hill (make sure the handbrake works and chock the wheels if necessary) and take the connector end off of your hosepipe so you have a steady, even stream of water.
Starting at the back, find the furthest back hole in the chassis rail and poke the hose end through, pushing it in as far as the hose can go. Observe under the vehicle as the sand and mud begins to flow out from drain holes further down the car.
Wait until this flow becomes clear water, and then adjust the hose around, pulling it out and putting it back in until the water runs clear. Pull the hose out completely, find the next hole down the line, and repeat the process.
Once you've made your way down the length of the vehicle, repeat these steps on the opposite side until it's all clean and clear. You may need to rinse the underbody down again at this stage to remove any loose sand that's run down from the rails.
Once dry, you can add/top up protection underneath with our Under Armer underbody protection spray. For offroad fanatics, the Under Armer spray was meticulously crafted for ultimate corrosion protection down under. Over 5 years of development and 400 formulas went into making this unique water based formula that’s free of harsh solvents, sticky lanolin, oil, or wax which LOVE attracting sand and dust. We’ve incorporated the absolute best corrosion inhibitors that we can get into this state of the art formula, and our rigorous testing against all other offerings show how far ahead this formula is - there’s simply nothing that even comes close! It's a simple spray on, rinse off application that cures to a clear, non-sticky new look finish and is suitable for all underbody metals, rubbers and plastics.
See our guide below for full instructions on this.


Engine bay cleaning
Chances are, you will have a quite lot of mud, sand and salt in the engine bay after any trip off road. It's always a good idea to quickly clean all this up so it doesn't sit inside the engine bay and cause issues like foul smells, or get in the way when you're trying to swing a spanner. It's best to do this before the rest of the car, to avoid water drying on the rest of the paintwork.
Grab some Down & Dirty, a Nuts and Guts or Big Boy Brett brush, a couple Dirty Deeds cloths and a battery powered portable blower if you have one. Make sure the engine and any rubber hoses are cool to the touch before you start.
Give the engine a good rinsing, being careful to avoid intakes, electrics, and any other locations you don't want water getting into. Some manufacturers have exposed ECUs under the windscreen area, so do your best to not force water in here (angle the hose towards the front of the car where possible).
Break the engine bay up into quarters and work on one section at a time, to ensure you get a thorough clean done.
Dampen your Dirty Deeds cloth and add a few spray of Down & Dirty onto it. Spray Down & Dirty directly onto the engine bay on dirty areas. Immediately agitate with one of your bushes, and wipe over any parts that cannot be agitated with the Dirty Deeds cloth. Rinse thoroughly with low pressure from the hose, taking care around any electrical components, air intakes, alternator, fuse box etc.
After rinsing, blow any remaining water out of nooks and crannies with the blower, then dry the rest of the engine bay down with a clean and dry Dirty Deeds cloth.


Wheels
If your wheels are heavily caked in mud, give them a quick rinse to remove the majority of this first to avoid rubbing it into your wheels and causing scratches.
Prepare a separate bucket for washing your wheels and 3/4 fill it with water. If you want, you can also add a Great Barrier Thingy to your Wheels bucket for that extra element of protection, particularly if you have delicate finish wheels. Add in one cap of Dirty Times Wash (ideal for salt and grime removal), and agitate the mixture with your pressure washer or hose to produce a nice head of suds. Add your chosen wheel brushes to the bucket.
For those 4WDs that produce a lot of brake dust, grab Wheely Clean and evenly mist it over the wheel surface. Allow it to dwell for no more than 45 seconds - 1 minute, and then thoroughly rinse off.
If your 4WD doesn't produce much brake dust, or for caked on mud, clay, red dirt and grime, our Down & Dirty will be a better option here as the formula is packed with chelating agents to break down and dissolve these heavier minerals and grime. Mist the Down & Dirty evenly across the entire wheel and tyre.
Now's the time to grab your Little Stiffy and scrub over ONLY the tyres to remove the grime and any browning. Rinse the wheel and tyre thoroughly with a strong jet of water from your hose or pressure washer. This pre clean step is important to prevent scratching the wheel face with the heavier grit and grime.
We find a combination of wheel brushes is the most effective way to clean wheels, as they are all very different. If you have open spokes, the Flat Head brush is excellent for cleaning the inner barrels of the wheel. The Little Chubby is a more general purpose brush for tyres and wheel faces. Our Nuts and Guts from the Foursome brush set allows for cleaning of tight or intricate areas around the wheel nuts, inner seams or lips, and into tight corners. With all of these brushes, you'll want to dip them into your Wheels bucket to soak up a good helping of suds, and then start cleaning the wheel. Rinse your brushes often in your bucket to avoid spreading the dirt around.
After the wheels have been scrubbed, give them a thorough rinse down, paying extra attention to the brake drum/disk, and upper and lower ball joint areas, and the inner barrel of the wheel to dislodge any mud or sand that might be hiding there.
Wet Dreams can be applied to the wet wheels once they've been cleaned to add super hydrophobic protection, which will help make the wheels easier to clean next time round. Apply an even mist across the wheel face, and then immediately and thoroughly rinse off to activate the super hydrophobic behaviour.

Door jambs
To avoid any water drying on the paint, it's best to clean your door jambs before you snow foam.
Using the open end of the hose is the safest way to avoid any excessive overspray into the car itself, but if you feel confident using the sprayer or your pressure washer, that will work too. Most pressure washers will have the ability to twist the very end of the head to change the water pressure coming out of them, which can be helpful to limit or eliminate overspray of water into the car.
Start by opening all four doors to give you unrestricted access to all the door jambs. Thoroughly rinse off starting from the top and working your way down, being careful not to flood any water into the interior.
For lighter dust and water spots, grab two clean and dry Dirty Deeds or a Twisted Little Sucker cloth and some Clean Detail. Liberally spray the Clean Detail into the door jamb, and gently wipe over with one cloth, making sure to flip and turn often to a clean side. Wipe off with a second clean and dry cloth if needed.
If your door jambs are very dirty, covered in mud or sand for example, you'll want to use Orange Agent or Down & Dirty and a brush from our Foursome set like the Big Boy Brett or Nuts and Guts. Have a bucket filled with fresh water handy to rinse the brush out in often.
Spray the Orange Agent or Down & Dirty liberally over the surface, then agitate well with your chosen brush, paying particular attention to seams, rubber seals, plastic parts, and door skin drain holes. Don't allow them to dry - thoroughly rinse off after you've done each section. Make sure to avoid removing the grease from the door hinges.

Pre wash
For 4WDs that are heavily caked on with mud, you'll want to pre rinse it first with your pressure washer or hose to remove as much of this thicker mud as possible, and then move on to the pre wash foam.
Our Mega Snow Job is perfect for dirtier 4WDs, with a stronger cleaning formula, that's bumped slightly alkaline (a pH of around 9.0) to aid deeper and more effective cleaning. It's still safe to use regularly, but it can affect carnauba waxes and it will begin to affect weaker sealants over time too, so keep this in mind! It's exceptional at emulsifying and removing salt, getting into all the nooks and crannies throughout the vehicle. The Mega Snow Job in particular has great built in anti-rust attributes as well, so well worth using after a beach weekend.
If you've got caked on mud or dirt on the paint, particularly the lower sections of the doors, you need to keep in mind that this dirt could be in the very acidic or alkaline ranges of pH depending on where you live. This means that the dirt caked on there will dramatically effect any waxes, sealants or coatings you have previously used. It could mean that you have to top up the protection on your 4WD more often in these areas.
Using a pre wash like Mega Snow Job will dramatically reduce the risk of inflicting scratches or swirls into your paint when washing, so it's a very important step if you want to keep your four wheeled friend looking its best.
You should have half of the Snow Blow Cannon canister left from the previous steps. Starting at the lower back part of the vehicle, begin foaming in a methodical overlapping motion to ensure even and thorough coverage. Make your way around the vehicle until it's completely covered in foam.
Mega Snow Job doesn't need to dwell for a long time, 1-2 minutes is usually enough. Begin thoroughly rinsing it off, starting on the roof and making your way down the car in a methodical overlapping motion. Break the car up into vertical sections, e.g rear quarter, rear passenger, front passenger, windscreen, bonnet, front etc. This way, you ensure that the pressure washer has passed over every section of paint. The Mega Snow Job will have softened and loosened a lot of the dirt, and the mechanical action of the water from the pressure washer will remove a majority of this grime, so make sure you cover every section.
As you are rinsing, you may notice mud, sand and grime coming out of seals, seams, plastic trims, canvas and other places that it really likes to hide. Take your time and rinse these areas extremely well, until you get clear water only running out, otherwise you run the risk of scratching the paint later on during the washing stage.
Once finished, you'll need to move on to your hand wash.

Hand wash
Our Dirty Times Wash was custom formulated for smashing through hardcore salt, mud, minerals and red dirt removal, with powerful protection against corrosion and epic levels of lubrication and suds for a safer clean - ideal for those dirtier details after a long adventure. Its unique lower pH pairs it perfectly with the higher pH of the Mega Snow Job, for more targeted mineral removal without drying out your skin. We’ve built some true rust inhibitors into this formula for some real protection, something we found quite lacking in other so called “salt washes”.
.jpg)
Always wash out of the sun when possible, and make sure the vehicle is cool to the touch. Usually the early morning or later afternoons are ideal.
With your buckets ready, and the Great Barrier Thingy's in them, fill both buckets 3/4 full with water. Add a capful of Dirty Times Wash (30mL) into the Wash bucket. Give the solution a blast with the pressure washer to froth the mixture up and give it a nice head of suds.
For 4WDs and other larger vehicles like Trucks, Caravans etc, we find the Wash Pillow the absolute best wash tool, as it holds a lot of suds, and with its larger surface area, it makes shorter work of larger areas.
Rinse The Wash Pillow out in the Rinse bucket water first, then dip it into the Wash water bucket to fill it with suds. Wash the car from top to bottom, rinsing your wash tool in the Rinse bucket water after each section (one section could be a panel, or half a panel depending on how dirty the car is).
TIP: When using the Shagtastic Wash Pad, Shagamittastic Wash Mitt or The Wash Pillow, take care around badges and sharp corners, as the shagadelic weave can get caught if you're not careful - use lighter pressure around these areas. If you have roof racks, just do your best around these areas - the Shagamittastic Wash Mitt can make these areas a bit easier. Side steps can make it easier to reach the roof if you need, like we've done in our 4WD cleaning video, otherwise a small safety step or step ladder might be helpful for you to reach the roof. Our Foursome brushes can be very handy for getting into these areas around badges, emblems etc.
After the whole car has been washed, use a gentle stream of water to rinse the entire car with the hose, to help remove the larger water beads and droplets.

Inspection
After washing, it's a good idea to inspect the condition of the paint to see if any further cleaning or decontamination steps are necessary. If the paint feels rough or has small specs embedded in it, our Three Way and Claying Rubber combination will effectively remove this embedded dirt and make the paint smooth again.
Any stains from trees, mud, clay, or salt can be removed in most cases with our Paint Cleanse & Restore.
If you want to add protection we have a few options to choose from in our range.
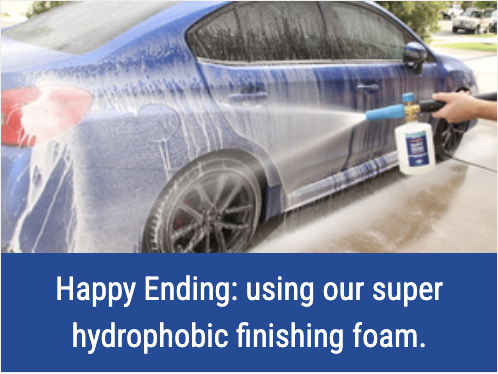
Happy Ending is our super hydrophobic finishing foam that is applied through the Snow Blow Cannon for spray on, rinse off protection. It adds super hydrophobic and durable protection to the paint, and a good dose of gloss and slickness to boot. We call it the biggest cheat in car care, because it's such an easy way to add a good layer of protection to every exterior surface of your vehicle. The quick application is well suited for larger 4WDs, boats, caravans, camper trailers etc.
Bead Machine is our most durable and protective paint sealant, which adds a super hydrophobic protection to the paint, and lasting 3-4 months on most vehicles. It's applied to a dry, Flash Prepped car, with two dry Big Softie cloths. It's a bit more time consuming, but it's more durable and protective, and can be topped up each wash with Happy Ending to maintain the high level of protection.
If you're a hard core frother, then our Beaut Beads paste wax is the ultimate protection for that special, high end wax look for your 4WD. More time consuming again, but the resulting look of the paint is unmatched in our line up of waxes and sealants.


Drying
We have 2 primary ways of drying; Boss Gloss with The Twisted Mother Sucker/Twisted Pro Sucker/Big Green Succker, and the perfectionists way of drying with After Glow plus 2 Big Softie cloths.
The Twisted Mother Sucker was designed for fast & easy drying of supersized vehicles. This huge 90cm x 60cm, mega absorbent towel is perfect for bigger 4WDs, boats and caravans. Its premium 800GSM single sided microfibre material ensures a lightning fast drying experience even in the most intricate areas, with its handy and ergonomic hand pockets which make holding the cloth enjoyable and easy. The twist pile loop material is the absolute best at sucking water from your paint, and you’ll appreciate just how easy it is to wring out and keep drying on those larger surfaces.
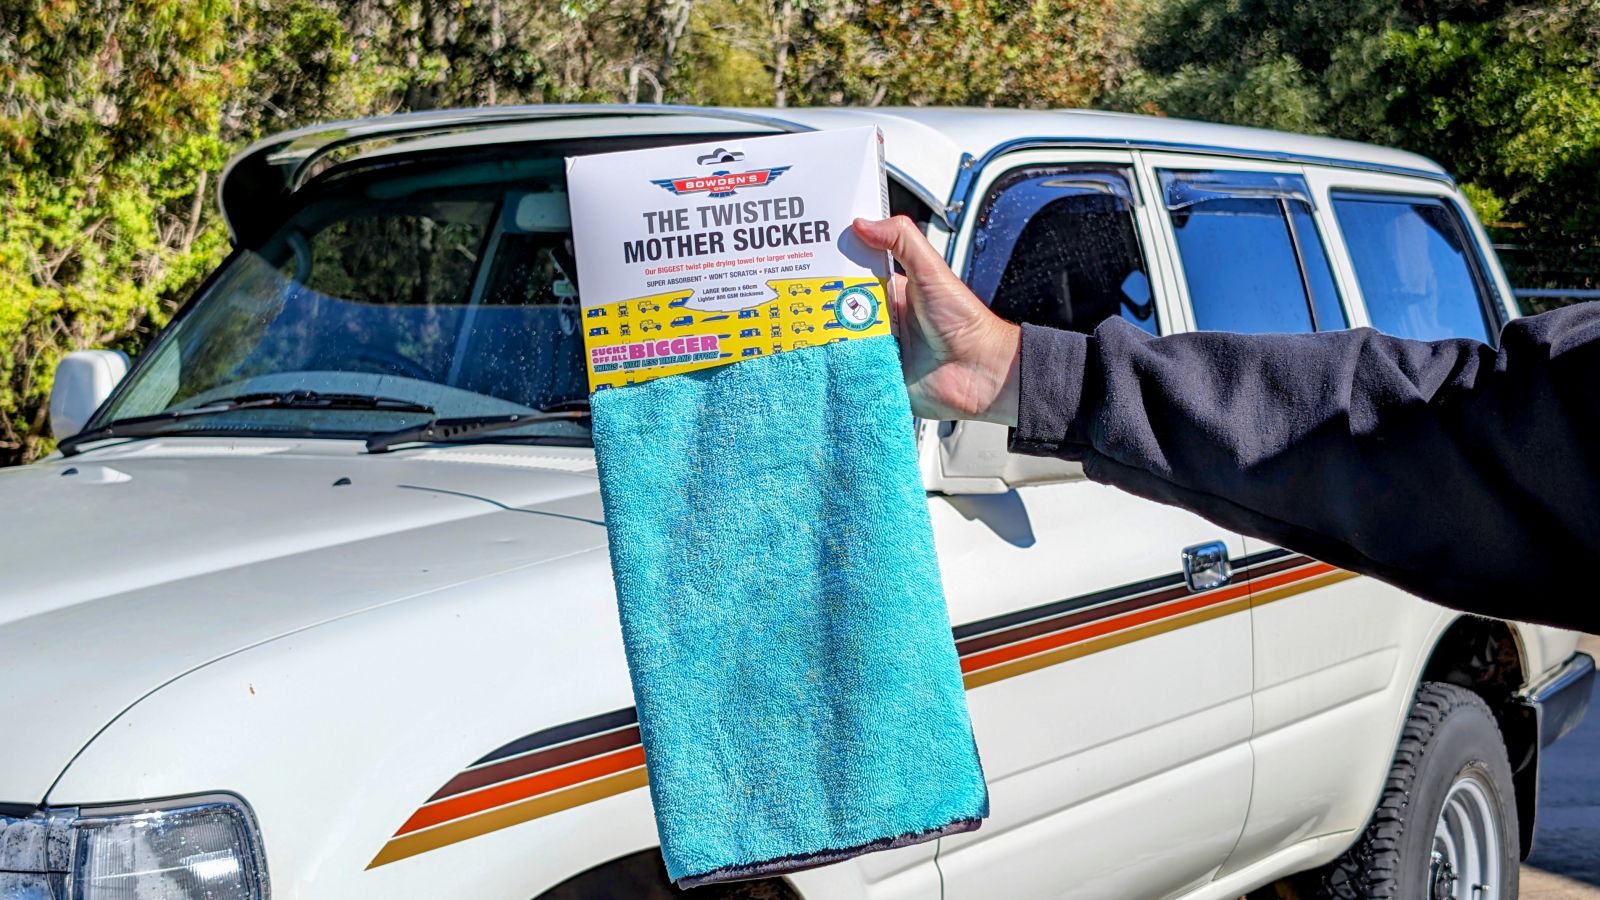
For easy drying, drape it over your arm with the bulk of the towel hanging down, then spray 4-6 sprays of Boss Gloss straight into the towel. Now dry the vehicle like you normally would, starting with the glass, then working top to bottom. The dedicated hand pockets allow for easy control of the towel, and also are handy for getting into any tight crevices, weather shields, roof racks etc. This cloth will easily dry multiple vehicles in succession - it holds a lot of water!
After Glow is great to finish with if you're after something to put on your 4WD that won't attract as much dust. After Glow's formula is anti-static, so it will help lessen the amount of dust on the surface - great if you're doing some off roading!
The Twisted Little Suckers are perfect for those intricate areas around door jambs and wheels, especially when paired with a blower to remove water from all the crevices it likes to sit in. We prefer to keep the orange one for door jams and less dirtier areas, and the black one for wheels and other areas where you may encounter dirt. This separation keeps you from rubbing dirt back onto the paint, potentially causing swirl marks.

Tyres
Most 4WD owners will have had experience with shiny tyre shines that attract every molecule of sand, dust and dirt from the surrounding hectare. We are glad to announce that neither of our protective tyre dressings will attract dust, in fact, they help to repel a lot of the dirt, mud and sand that would ordinarily stick to and stain rubber.
With the tyre clean and dry, spray 6-8 sprays of Tyre Sheen or Sweet Rubber into a foam applicator like our All Sorts applicator and then apply evenly over the rubber surface. Rub back and forth with the All Sorts over the entire tyre, making sure to get into the tyre lettering and any higher side wall sections if you have chunky tyres.
The All Sorts applicator is a robust tyre shine applicator that makes this job a breeze. Apply more Tyre Sheen or Sweet Rubber if needed (if the rubber is really dry, it will soak it up initially), and wipe it over until you get a nice, even finish. Wipe any excess product from the wheels or white walls with a Dirty Deeds cloth. Allow the tyre to dry for 5 minutes, and that's it!
If you want an even darker and shinier finish, you can apply a second layer after the first layer has dried and cured for 5 minutes.

Interior cleaning
If you've been on an extended offroad trip, it's likely that the interior is just as dirty as the exterior of the vehicle. You'll want to start by removing as much of the accumulated pie wrappers, coke cans, and other food debris as possible. You will also want to remove any car seats, and floor mats, to give yourself better access to the interior.
Starting off with a thorough vacuum, using a combination of the crevice tool for general carpet and nook/cranny cleaning, and a brush tool for wider areas, mats, seats etc. If you've been anywhere near a beach, you're likely to find sand literally everywhere, so this step might take a while.
A neat trick for removing sand from carpeted mats, is using any household roller style vacuum like a Dyson, as these help vibrate and agitate the sand out of the fibres that ordinary vacuuming does not remove.
Once all the sand and loose dirt has been removed, you can start the deeper cleaning process. Heavy mud can be taken care of with Orange Agent. Lighter grime/finger prints can be removed with our interior specific products - Vinyl Care for plastics, and Leather Love/Leather Guard for leather seats which have likely copped a hiding.

Still bogged?
Should you have any questions about anything mentioned in this article, or have questions about other products and processes, feel free to get in touch on 1800 351 308, or shoot us an email to info@bowdensown.com.au
To find your closest retailer, see our Stockists link here - https://www.bowdensown.com.au/store-finder/
Happy bush bashing!
Gareth Bostock

Products Used


Dirty Times 4WD Wash
Our most powerful and protective wash, for 4WD's, boats and outdoor fanatics.
$23.99


The Twisted Mother Sucker
Our BIGGEST twist pile weave drying towel, for faster drying of larger vehicles.
$54.99